Sunday, June 29, 2014

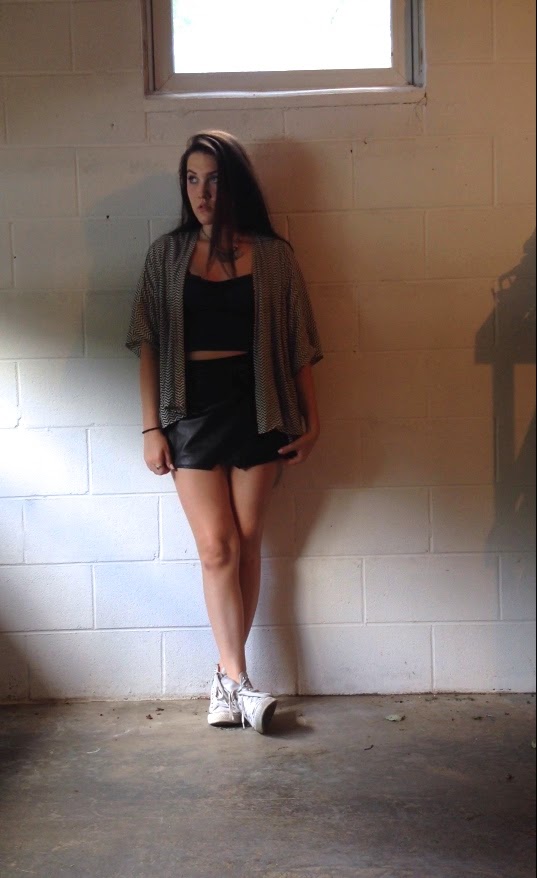
In the shadows: OOTD


I have to say that I constantly try to find different back drops for these posts. So today I landed in my garage and thought "hmm..." and thus this post was born.

This makes my converse look like they aren't almost gray and super stained. Each time I think about bleaching them, something stops me. Stains and shit give them character right? Right. I own a million pairs of shoes yet only wear these or occasionally I'll wear my black ones. I don't know what to say; I love them. 
 Oh as ps can we peep my dog in the corner trying so hard to be included.


Kimono: Forever 21 | Crop top: H&M | Bralette: Necessary Clothing | Shorts: Necessary Clothing | Coin Necklace: H&M | Shoes: Converse

Thursday, June 26, 2014

DIY chevron wall art


I bought this mirror at the thrift store for 99¢ and I knew I could do something cool with it. I decided to make in into a mirrored chevron piece for my wall since it was really scratched up. I taped in a chevron pattern like this:

You will need to cut piece of tape all the same length then around 5 with an angle to place along the edge. Then follow the pattern above. Tape off the side of the mirror then spray with spray paint of your choosing. When you peel away the tape, you will have little stripes. 

Once you let the paint dry and have the tape peeled off, you can add a string across the back to hang it but mine already had one. 


Monday, June 23, 2014

Review: Sally Hansen Color Foil

I have been on the hunt for the new Sally Hansen Color Foil nail polishes. In particular I needed  the color 'rose copper'. I seriously needed this like I needed air and finally found it at Target for $6.99. A little more than I like to spend but I felt like it was worth it.

The weird thing about this polish is that it tells you not to use a base or top coat. I realized this after I had already used both.

So backing up a little, I painted my nails1 streaky coat then 2 more and they looked super streaky and the polish was clumped up on my nails. I put on a top coat to smooth things over and my nails looked yellow and worse. I was ready to find my receipt, write a negative review and call up Sally Hansen when I noticed that the back of the bottle says "for best results, use without base or top coat." I had heard so much people talk about this line of colors and seen so many instagrams that looked nothing like my gross, ratchet manicure.

Here are the results of the base/top coat fail:


In the fourth one, you can see how yellowy and gross it turned out. 

I decided to take off all the polish and do exactly what the bottle told me; apply 2 coats without a base or top coats and DAMN. I was impressed. The photo at the very top of this post shows the full manicure.

My nails were dry in under 5 minutes. I mean dry like no dents or chips, rub your nails together, eat a sandwich, do yard work dry. They were rock solid and the color was beautiful. It wasn't this peed on penny type of color but instead a gorgeous, rose gold that I love.

Left is 1 coats and right nail is 3 coats.


Basically, I love this color and style of nails. They looked so beautiful for a day but here is where the problem lies; because you can't use a top coat, the polish starts to chip by the next day. You may be able to add a top coat after the polish has completely dried but I'm too afraid of that nasty yellow color coming back. Overall, I would say these polishes are fun to try but the concept isn't perfect yet. 

Friday, June 20, 2014

Cream & Stripes: OOTD


Some days are gloomy and cloudy. Today was one of those days.  I used to be obsessed with skirts and owned 2 pairs of pants; that has changed now but something came over me and I put on a skirt. Why? Who knows. Why am I writing all about a skirt? Another excellent question. 


Skirt: H&M | Purse: H&M | Crop Top: Forever 21

Saturday, June 14, 2014

Ballenciaga Harlem: OOTD


This is by far the longest I've gone ever without a post. For that, I am sorry but no one wants to hear excuses. I have missed blogging so much so here I am with another quick post.

When I came across this shirt at the thrift store I thought, "oh cool balenciaga... wait." So yeah I have no idea what ballenciaga is but after a quick google search, I found a ton of people wearing this mock Balenciaga shirt. This right here is the reason I love thrust stores. (also because this shirt cost me less than $1)


Tshirt: thrift store | Shorts: H&M | Flannel: Forever 21 | Choker: eBay | Necklace: vintage

Thursday, June 5, 2014

DIY cookie dough larabars


I love Larabars so much. They have between 2-5 ingredients and are the perfect after workout treat. I don't love the price though. As soon as I found out how few natural, real ingredients they had, I knew I could make them myself. 

Really all they are is dates, nuts and whatever flavor they are. The chocolate chip cookie dough is my absolute flavor so I bought the ingredients and made them up. 

Ingredients: 

2 cups cashews
1 cup/ ~17 dates
chocolate chips
*i used a few peanuts because I had just under 2 cups of cashews


I boiled about half a cup of cashews at a time and blended them. You don't need to do it this way if you have a food processor but I was using my nutribullet. 


 Next, I cut up and pitted my dates until I had a full cup of them. If you don't want to measure, I found it took me 17 dates to make a cup so between 15-20 depending on how sweet you want them. I wish I used a bit less so they were slightly less sweet.

I blended my dates until they turned into this giant clump of sticky goop.
 * Here is where I used some peanuts just to fill out the amount of cashews. I normally just use cashews but this didn't change the flavor too much.

I put this in just to tell you that you can sub in some other nuts if you don't love cashews.

Finally, I combined everything with my hands until a ball of couch had formed. All that is left to do it pop this in the fridge to harden up a bit and cut them into bars or bites or whatever you want.


If you make the bars into the normal size of actual Larabars, you should wind up with around 14 bars.

Monday, June 2, 2014

Contouring and Highlighting: drugstore products

Wow I haven't done a makeup post in such a long time but I've been really busy doing other things... Ok so I've just been doing really boring makeup and stuff lately and neglecting this section but that is ok because here they are: my favorite products for HACing from the drugstore. HACing is highlighting any contouring if you didn't know. 


We've all seen those crazy photos on instagram like this one. Obviously that is unrealistic for the average day or even the average special occasion. That being said, on a day when I want to contour, I just go under my cheek bones and on my temples. Its of course up to you where you want to contour. I highlight under my eyes every day because I have the worst under eye circles and need some serious concealer and highlighting to combat that. (ps if you want to hear more about what I use to cover my dark circles I do have a post up. You can click this link here to view that)

Any way let's get on with what I use. 


This is the Fit Me foundation from Maybelline. I love this because it is a stick foundation with an oil absorbing core so it won't get greasy and will help with oily skin. They make this is about a zillion colors so find one that is darker than your skin.

Just realized that I have another Maybelline product here but I happen to really like them so there. If you haven't heard to the dark circle eraser by now, are you living under a rock?! Joking but this is a concealer buttttttt, they also make this particular shade which is a brightener. The combination of the color and the spongey tip make this perfect to highlight under the eyes. 


Finally for actual face highlighting, I use this. Its the elf shimmering facial whip. Again they make this in a few colors so find something that compliments your skin. This stuff smells amazing and has just the right amount of super-fine shimmer to add a beautiful glow to your skin.